Unlock Multi-Tenancy in Laravel to Build Scalable SaaS Apps

Introduction to Multi-Tenancy in Laravel
Multi-tenancy is a crucial architectural approach employed in Software as a Service (SaaS) applications, wherein a single instance of an application serves multiple clients, known as tenants. This design paradigm is particularly significant in the context of Laravel, as it allows developers to create multi-tenant applications that leverage efficient resource usage while maintaining data isolation between tenants. With the growing demand for flexible and cost-effective solutions in cloud computing, multi-tenant architecture has gained traction within the software services landscape.
By implementing multi-tenancy in Laravel, developers can streamline resource allocation, enabling a single application footprint to support various clients without compromising performance or security. This approach not only maximizes resource efficiency but also reduces overhead costs associated with maintaining separate instances for each tenant. The inherent scalability of a multi-tenant application in Laravel aligns seamlessly with the needs of modern businesses, where agility and responsiveness to market changes are paramount.
What is Multi-Tenancy?
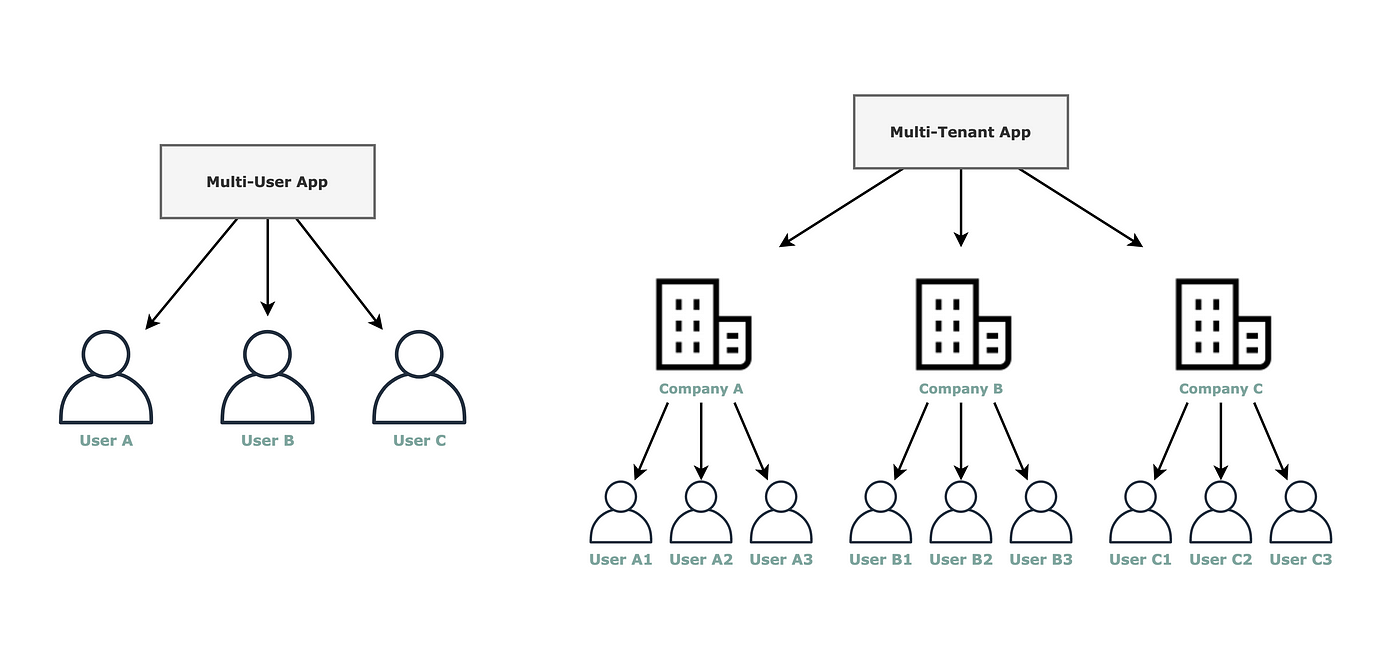
Multi-tenancy is an architecture where a single instance of a software application serves multiple tenants. Each tenant’s data is isolated, ensuring privacy and security.
Importance in SaaS Applications
In SaaS applications, multi-tenancy enables efficient resource utilization, centralized maintenance, and cost savings. It allows developers to manage updates and features for all tenants simultaneously, reducing overhead.
Benefits
Cost Efficiency: Shared infrastructure reduces operational costs.
Scalability: Easily add new tenants without significant changes to the application.
Centralized Maintenance: Apply updates and patches across all tenants from a single codebase.
Improved User Experience: Consistent features and performance for all tenants.
Different Multi-Tenancy Architectures
Multi-tenancy is a crucial architectural design pattern for software applications aiming to serve multiple clients or customers while ensuring data isolation and tailored experiences. In Laravel, developers can deploy various multi-tenancy architectures, each with its unique advantages and disadvantages. The three primary architectures include single database with a shared schema, multiple schemas, and multiple databases.
1. Single Database – Shared Schema
This is the simplest form of multi-tenancy. All tenants share the same database and same tables. Each row in the database includes a tenant identifier (like tenant_id) to separate data.
Advantages:
Easy to set up and maintain
Low infrastructure cost
Good for small applications with low complexity
Disadvantages:
All tenant data is stored together, which can raise data security and privacy concerns
As data grows, performance may suffer
Query logic must always include tenant filtering
Best for: MVPs, prototypes, or apps with light tenant-specific requirements
2. Single Database – Multiple Schemas (Schema-per-Tenant)
In this approach, tenants share a single database, but each has a separate schema (namespace). This gives a higher level of data separation without needing multiple databases.
Advantages:
Better data isolation than shared schema
Easy to apply tenant-specific changes at the schema level
Lower cost than maintaining multiple databases
Disadvantages:
Not all database systems support multiple schemas (e.g., PostgreSQL supports it; MySQL does not)
Schema updates and migrations can get complex
Still shares the same database resources
Best for: Medium-sized SaaS platforms using supported DB systems like PostgreSQL
3. Multiple Databases – One Per Tenant
This is the most secure and scalable option. Each tenant has their own dedicated database. Laravel packages like stancl/tenancy support this setup very well.
Advantages:
Strong data isolation and security
Easier to scale and optimize performance per tenant
Tenant databases can be managed or backed up independently
Disadvantages:
Higher infrastructure and hosting costs
More complex setup and deployment
Application updates need to run across all databases
Best for: Enterprise SaaS applications or platforms with strict data isolation requirements
Choosing the Right Laravel Multi-Tenancy Architecture
When deciding on a multi-tenancy model in Laravel, think about:
The number of tenants you plan to support
Expected data volume and application load
Compliance and data privacy requirements
Your team’s ability to manage infrastructure
Also, consider using a Laravel tenancy package like:
stancl/tenancy– great for database-per-tenant modelsspatie/laravel-multitenancy– simple and flexibletenancy/tenancy– powerful, but requires a bit more configuration
Laravel multi-tenancy gives you the flexibility to build and grow scalable SaaS applications. Whether you choose a shared schema, schema-per-tenant, or database-per-tenant setup, the key is to align the architecture with your business goals, budget, and technical needs.
By making the right choice early on, you’ll save time, avoid costly migrations later, and offer a better experience for your users.
Overview of Laravel Multi-Tenancy Packages
Implementing multi-tenancy in Laravel is made easier through robust, community-supported packages. While Laravel does not provide built-in multi-tenancy support out of the box, several open-source solutions make it practical to create scalable, secure, and isolated SaaS platforms. The most widely used packages include:
stancl/tenancy
spatie/laravel-multitenancy
tenancy/tenancy
Each package offers unique features tailored for specific business cases, and choosing the right one depends on your application’s architecture, scale, and goals.
1. stancl/tenancy
The stancl/tenancy package is one of the most popular and flexible Laravel multi-tenancy packages. It supports multiple tenancy architectures, including:
Database-per-tenant
Table prefixing (single DB)
Subdomain/domain-based tenant identification
Key Features:
Easy to install and configure
Tenant routes, middleware, and events
Automatically creates and manages tenant databases
Supports Laravel Sail and Docker deployments
Excellent documentation and active maintenance
Best for: SaaS applications needing high data isolation, subdomain routing, and a developer-friendly experience with Laravel.
Why Choose stancl/tenancy?
If you’re looking for a Laravel tenancy package that balances power with ease of use, stancl/tenancy is a strong go-to. It’s especially useful for teams that want to ship fast without giving up long-term scalability.
2. spatie/laravel-multitenancy
Spatie’s package provides a clean, opinionated structure for multi-tenancy. It’s built with Laravel’s elegance in mind and focuses on simplicity and separation of concerns.
Key Features:
Tenant-specific middleware
Uses Laravel events for tenant lifecycle hooks
Supports queue separation, caching, and task execution per tenant
Great for apps where tenants require different behaviors or configurations
Best for: Projects that need strict modularity, strong separation between tenant logic, and custom configurations per tenant.
Why Choose spatie/laravel-multitenancy?
Ideal for developers who want a well-structured, minimalistic tenancy setup and are comfortable customizing behaviors through events and service providers.
3. tenancy/tenancy (from Tenancy for Laravel)
This package is a mature, enterprise-grade solution for Laravel multi-tenancy. It supports multiple tenancy models (including DB-per-tenant and shared database schemas) and offers powerful customization.
Key Features:
Supports multi-database, multi-schema, and single-database setups
Built-in support for separate queues, cache, and configuration per tenant
Optimized for high-traffic, large-scale applications
Community-driven with a plugin system
Best for: Large SaaS platforms or apps with complex tenancy requirements that demand fine-grained control over infrastructure.
Why Choose tenancy/tenancy?
If performance and flexibility are top priorities, and your team is ready to manage more complex infrastructure, this package delivers the scalability required for enterprise SaaS with Laravel.
Which Laravel Tenancy Package Should You Use?
Here’s a quick comparison based on typical needs:
| Package | Best For | Data Isolation | Ease of Use | Scalability |
|---|---|---|---|---|
| stancl/tenancy | General-purpose SaaS with fast setup | High | ⭐⭐⭐⭐⭐ | ⭐⭐⭐⭐ |
| spatie/laravel-multitenancy | Projects needing modular and clean architecture | Medium to High | ⭐⭐⭐⭐ | ⭐⭐⭐ |
| tenancy/tenancy | Enterprise apps with custom needs | Very High | ⭐⭐⭐ | ⭐⭐⭐⭐⭐ |
Choosing the right Laravel multi-tenancy package depends on your project’s size, complexity, and long-term vision. For startups and fast-moving teams, stancl/tenancy is a great starting point. For highly structured apps, spatie/laravel-multitenancy offers clean separation. And for large-scale SaaS needing top-tier customization, tenancy/tenancy brings the tools needed for serious scalability.
Step-by-Step Setup Tutorial using Stancl/Tenancy Package
Implementing multi-tenancy in a Laravel application can significantly enhance its scalability, making it ideal for Software as a Service (SaaS) solutions. This tutorial provides a clear guide to using the stancl/tenancy package to establish a multi-tenant architecture. The installation process is straightforward and consists of several key steps.
This guide walks you through the complete setup process using the stancl/tenancy package in a clean, step-by-step format.
Step 1: Install Laravel and Set Up Your Project
Before diving into multi-tenancy, ensure you have a Laravel application ready. If not, create a new one:
composer create-project laravel/laravel your-app-name
Navigate into your project folder:
cd your-app-nameStep 2: Install stancl/tenancy Package
Use Composer to install the stancl/tenancy package:
composer require stancl/tenancyStep 3: Publish the Configuration Files
After installation, publish the package’s config files:
php artisan vendor:publish --tag=tenancy-configThis creates a config/tenancy.php file where you can control tenancy behaviors, such as tenant identification via subdomain, domain, or path.
Step 4: Create the Tenant Model
Create the Tenant model that represents your tenants in the system:
php artisan make:model TenantNow edit the model to extend the base tenant class provided by the package:
<?php

namespace App\Models;

use Stancl\Tenancy\Database\Models\Tenant as BaseTenant;
use Stancl\Tenancy\Contracts\TenantWithDatabase;
use Stancl\Tenancy\Database\Concerns\HasDatabase;
use Stancl\Tenancy\Database\Concerns\HasDomains;

class Tenant extends BaseTenant implements TenantWithDatabase
{
    use HasDatabase, HasDomains;
}
In config/tenancy.php, update the tenant model path:
phpCopyEdit'tenant_model' => App\Models\Tenant::class,Step 5: Choose and Configure Tenant Identification
You can choose how Laravel will recognize tenants — by subdomain, custom domain, or URL path. For subdomain-based identification:
'tenant_identification' => Stancl\Tenancy\TenantFinder\DomainTenantFinder::class,Make sure your local development environment (like Valet or Homestead) supports wildcard subdomains.
Step 6: Set Up Middleware for Tenant Routing
Middleware ensures the application loads tenant-specific settings before serving a request. Open app/Http/Kernel.php and add this to the web middleware group:
\Stancl\Tenancy\Middleware\InitializeTenancyByDomain::class,
\Stancl\Tenancy\Middleware\PreventAccessFromCentralDomains::class,
This loads the correct tenant based on domain or subdomain and blocks tenant routes from central domains like example.com.
Step 7: Run Tenant Migrations
Now that your tenants are set up, create tenant-specific migrations. Use the --tenant flag:
php artisan tenants:artisan "migrate"You can also create tenant-specific migrations using:
php artisan make:migration create_users_table --path=database/migrations/tenantStep 8: Create and Test a Tenant
To test your setup, you can create a tenant via code or tinker:
use App\Models\Tenant;

$tenant = Tenant::create([
    'id' => 'tenant1',
    'domain' => 'tenant1.yourapp.test',
]);

$tenant->makeCurrent();
$tenant->run(function () {
    \Artisan::call('migrate', ['--path' => 'database/migrations/tenant']);
});
Visit tenant1.yourapp.test in your browser (if using Valet or custom DNS) to verify that the tenant is working.
The stancl/tenancy package simplifies multi-tenancy in Laravel by handling tenant detection, database switching, and isolated configurations automatically. Whether you’re building a customer portal, admin dashboard, or full-featured SaaS, it gives you the flexibility and scalability needed for modern applications.
Don’t forget to check out the official stancl/tenancy documentation for advanced features like:
- Tenant event hooks (on create/delete)
- Queue and cache separation per tenant
- Support for Laravel Sail and Docker
- Central vs tenant routes
Your Guide to Laravel Multi-Tenancy Starts Here
Throughout this process, it is critical to refer to the official documentation for the laravel tenancy package for additional details and advanced configurations. Following these steps will help you effectively set up a multi-tenant application in Laravel, laying the groundwork for a robust and scalable SaaS application.
Converting Existing Laravel Apps to Multi-Tenant
Converting an existing Laravel application into a multi-tenant system is a significant undertaking that requires careful planning and execution. Whether you’re scaling up to a SaaS (Software as a Service) model or simply optimizing resource management, there are several key steps involved in transitioning your app without causing major disruptions to its existing functionality.
1. Identifying Key Modifications
The first step in converting your Laravel application to multi-tenancy is identifying the areas of your app that require changes. Database schema adjustments are typically the most critical modification needed to support multi-tenancy. There are several approaches you can take:
Distinct Databases per Tenant: Each tenant gets its own database. This method provides the highest level of data isolation but can be complex to manage as the number of tenants grows.
Shared Database with Tenant Identifiers: Multiple tenants share a single database, but each record is tagged with a tenant-specific identifier (e.g.,
tenant_id). This approach is simpler but may lead to performance issues as the tenant base expands.
The choice between these strategies depends on your application’s requirements, such as data isolation needs, performance, and long-term scalability.
2. Data Migration and Security
When transitioning to a multi-tenant model, you must ensure that the migration of your existing data is both secure and accurate. Using tools like the Laravel tenancy package can greatly simplify this process by handling tenant-specific database connections, routing, and authentication.
Before proceeding, make sure to back up your application and database. This backup acts as a safety net if any issues arise during the migration process.
Security is also a key consideration. With multi-tenancy, ensuring data isolation is crucial. Each tenant’s data should be kept strictly separate, with no risk of unauthorized access to another tenant’s information. Authentication and authorization layers need to be robust and fine-tuned to guarantee this security. Laravel’s built-in features, along with multi-tenancy packages, can be configured to address these needs.
3. Thorough Testing and Validation
Testing is a critical step when converting a Laravel app to multi-tenant architecture. The process must simulate different tenant environments to ensure proper functionality across all user groups. This can help uncover issues that might not be apparent when running a single-tenant application.
Key testing considerations:
Performance: Ensure the application remains performant as the number of tenants grows.
Routing: Test routing configurations to ensure that tenant requests are resolved to the correct data.
Authorization: Check that tenants can only access their own data.
Testing in a live environment should be approached cautiously. Minimize downtime by running tests during off-peak hours and ensuring that there’s an easy rollback path if problems arise.
4. Documenting the Process
One often overlooked yet essential step is maintaining clear documentation throughout the conversion process. This documentation should cover:
Changes made to the database schema
Configuration changes
New authentication processes
Tenant-specific routing logic
Documenting these changes helps ensure smoother future updates and makes it easier for other developers to understand and contribute to the project.
5. Embrace Multi-Tenancy Tools
By leveraging tools such as the Laravel tenancy package, developers can streamline the process of setting up multi-tenant features like tenant-specific routing, data isolation, and tenant-specific databases. These tools reduce the complexity involved, making the transition more manageable and faster to implement.
Converting an existing Laravel application to a multi-tenant architecture is a challenging but rewarding process. By carefully planning the transition, focusing on data migration, ensuring strong security and data isolation, and thoroughly testing the system, developers can transform a single-tenant application into a scalable, secure SaaS platform.
Incorporating multi-tenancy enhances the app’s ability to scale, streamline resource management, and offer a tailored experience to each client. Tools like the Laravel tenancy package provide essential building blocks that make the conversion process easier and more efficient.
Advanced Multi-Tenancy Concepts
In the realm of multi-tenant applications developed using Laravel, understanding advanced concepts is pivotal for achieving scalability and functionality. One crucial aspect involves managing tenant lifecycle events. These events encompass various stages such as creation, activation, deactivation, and deletion of tenant instances. Implementing efficient event listeners can ensure that resources are allocated properly and that there is minimal disruption when managing these tenant states. Utilizing the Laravel tenancy package allows developers to effortlessly handle these events, streamlining tenant management.
1. Evaluate and Prepare Your Application
Before jumping into code changes, start by auditing your current application:
Which parts of the app store or display tenant-specific data?
Are your users organized in a way that can be mapped to tenants?
Which database structure is most suitable — shared database, schema-per-tenant, or separate databases?
This evaluation will guide your decisions and help minimize disruptions during the migration.
2. Update Your Database Schema for Multi-Tenancy
Your application’s database architecture needs to support tenant separation. Depending on your needs, you can choose one of the following models:
Shared database with tenant ID column (easiest to start with)
Multiple schemas per tenant (requires schema support, like PostgreSQL)
Separate database per tenant (best for isolation and scalability)
For shared databases, add a tenant_id field to your models and enforce it in queries using global scopes or middleware.
For database-per-tenant setups, using a Laravel tenancy package like stancl/tenancy helps automate tenant database creation and management.
3. Migrate and Organize Existing Data
Once the structure is in place, it’s time to migrate your current data. Create a script or use database seeders to move or restructure data for each tenant.
Pro tip: Always create full backups of your code and database before migrating. You’ll want a rollback option in case anything goes wrong.
4. Implement Data Isolation and Security
Security is a top priority in multi-tenant applications. Make sure:
Tenants can only access their own data
All queries are tenant-aware (scoped by
tenant_idor database connection)Proper authorization checks are in place
Laravel middleware and policies can help enforce data access rules across your app.
5. Use a Laravel Tenancy Package for Efficiency
Rather than building multi-tenancy from scratch, consider using the stancl/tenancy package or spatie/laravel-multitenancy to streamline setup. These packages help with:
Tenant detection via subdomain or domain
Database switching
Routing separation for tenant vs central app
Middleware setup for tenant lifecycle
These tools reduce complexity and ensure best practices are followed during your migration.
6. Test Across Multiple Tenant Environments
After converting your app, it’s critical to test extensively:
Simulate multiple tenant sessions
Validate user login, data access, and tenant-specific features
Monitor for cross-tenant access bugs
Using tools like Laravel’s built-in testing, PHPUnit, and staging environments will help you catch issues before going live.
7. Document and Maintain the Transition
Documenting your changes helps your team understand how the multi-tenancy layer works. This is especially important for:
Onboarding new developers
Future updates and migrations
Debugging tenant-specific issues
Keep clear notes on tenant configuration, database setup, and custom logic added during the conversion.
Converting an existing Laravel app to a multi-tenant SaaS application is completely achievable with the right planning and tools. By leveraging proven solutions like the Laravel tenancy package, enforcing strong data isolation, and conducting rigorous testing, you can future-proof your application for growth, flexibility, and performance.
Overcoming Common Challenges in Laravel Multi-Tenancy with Simple Solutions

Building a multi-tenant Laravel application opens the door to scalable SaaS growth—but it also introduces unique challenges that developers must proactively address. From data isolation to performance optimization, overlooking these issues can lead to serious complications.
Let’s explore the most common challenges in Laravel multi-tenancy—and how to solve them using tools like the Laravel tenancy package and smart architectural choices.
1. Data Isolation and Security Risks
The Challenge:
One of the biggest risks in any multi-tenant system is accidental data leakage—where one tenant can access another tenant’s data due to a bug or misconfigured query.
The Solution:
Use the stancl/tenancy package to separate databases or apply table prefixing for strong data boundaries.
Apply global scopes to all tenant models to automatically filter queries based on the active tenant.
Enforce strict authentication and authorization at every access point in the application.
Perform code reviews specifically focused on tenant data separation.
Tip: Always test for cross-tenant access using automated tests or QA sessions with multiple tenant users.
2. Performance Degradation as Tenant Count Grows
The Challenge:
As more tenants are added, database queries, background jobs, and API calls can start slowing down due to increased load and poor data filtering.
The Solution:
Optimize indexes for frequently queried fields like
tenant_id.Implement Laravel’s cache system (e.g., Redis) to cache tenant configurations and frequent queries.
Use queued jobs for heavy operations (e.g., reports, notifications) to prevent blocking user-facing requests.
Leverage database-per-tenant architecture for better performance isolation if your app serves many tenants with high data volume.
Pro Tip: With stancl/tenancy, you can even use separate cache and queue connections per tenant, improving performance and stability.
3. Complex Application Logic and Query Management
The Challenge:
Adding tenant awareness to every query and business rule can quickly become overwhelming, especially in legacy applications not originally built for multi-tenancy.
The Solution:
Refactor your app with a Service Layer or Repository Pattern to centralize tenant-related logic.
Use model observers and event listeners to handle tenant-specific events like creation or deletion.
Implement middleware to initialize the tenant environment automatically on every request.
Best Practice: Avoid scattering tenant logic across your codebase—centralize it to keep your app maintainable and easier to debug.
4. Testing Tenant-Specific Scenarios
The Challenge:
Ensuring your application behaves correctly across multiple tenants requires a different testing approach than a typical Laravel app.
The Solution:
Use Laravel’s Pest or PHPUnit to write tenant-aware test cases.
Create test tenants in your seeder files and simulate user activity across different environments.
Automate tests to confirm data isolation, routing, permissions, and tenant-specific configurations.
Bonus Tip: Use the tenants:artisan command from the stancl/tenancy package to run tests or commands in a specific tenant context.
5. Monitoring, Logging, and Maintenance
The Challenge:
Keeping track of issues per tenant becomes harder as your user base grows. Without visibility into tenant-specific problems, debugging becomes inefficient.
The Solution:
Set up tenant-specific logging using Laravel’s logging channels.
Use tools like Laravel Telescope, Sentry, or Bugsnag to capture tenant context with every error.
Schedule tenant-level maintenance tasks (e.g., data cleanup, notifications) with cron jobs scoped per tenant.
Pro Tip: Build a simple internal dashboard to view tenant health, error rates, and performance metrics in real-time.
Solving these common challenges is critical to the success of your multi-tenant SaaS with Laravel. With the right structure, packages like stancl/tenancy, and thoughtful architecture, you can build applications that scale safely, perform reliably, and keep tenant data secure.
SEO Best Practices for Multi-Tenant Applications
In the competitive landscape of Software as a Service (SaaS) platforms, ensuring strong visibility in search engines is paramount for the success of multi-tenant applications. Developers must understand various strategies to optimize their applications for search engines effectively, particularly when implementing a multi-tenant architecture with Laravel.
Let’s explore the best practices for optimizing a multi-tenant Laravel application for SEO, focusing on architecture, metadata, and structured content.
1. URL Structure and Tenant Segmentation
The Challenge:
In multi-tenant systems, URLs must reflect tenant identity without sacrificing clarity or searchability.
Best Practice:
Use clear and crawlable URL structures that differentiate each tenant:
Subdomain-based:
tenantname.example.comPath-based:
example.com/tenantname
Both methods allow search engines to index tenant-specific content separately. Subdomains offer better domain-level separation, while path-based URLs are simpler to manage and configure within Laravel.
Laravel Tip:
Use Laravel’s Route::domain() or dynamic route groups to configure tenant-aware URLs with minimal effort.
2. Dynamic Meta Tags Per Tenant
The Challenge:
Generic or repeated metadata across tenant pages can trigger duplicate content issues, hurting SEO performance.
Best Practice:
Serve unique meta titles and descriptions for each tenant’s pages:
Include tenant name and service keywords in title tags
Customize meta descriptions based on tenant offerings
Avoid using the same meta template across tenants
Laravel Tip:
Use middleware or service providers to dynamically inject SEO meta data based on the active tenant’s settings.
Example with view()->share() in a service provider:
3. Implement Schema Markup for Rich Snippets
The Challenge:
Search engines rely on structured data to understand the purpose of your content. Without schema markup, you miss out on rich search features like ratings, FAQs, and product info.
Best Practice:
Use Schema.org markup to add context to tenant-specific pages. Examples include:
OrganizationorLocalBusinessfor tenant profilesProductorServicefor listingsRevieworAggregateRatingfor feedback
Laravel Tip:
Use packages like spatie/schema-org or manually insert structured data into Blade templates for maximum flexibility.
4. Canonical Tags to Prevent Duplicate Content
The Challenge:
Multi-tenant apps often reuse layouts, components, or even content. Without canonical tags, search engines may penalize pages that appear duplicated.
Best Practice:
Add canonical URLs to every tenant page
Ensure each canonical tag points to the correct version of the content
Avoid sharing core pages (like blog or documentation) across tenants without unique content
Laravel Tip:
Use Blade conditionals to insert tenant-specific canonical links:
5. Sitemap and Robots.txt Management
The Challenge:
Search engines need clear direction on which pages to crawl and index—especially in apps with hundreds or thousands of tenants.
Best Practice:
Generate dynamic sitemaps per tenant
Serve tenant-specific
robots.txtrules (if needed)Submit tenant sitemaps to Google Search Console using the correct subdomain or path
Laravel Tip:
Automate sitemap generation using Laravel Sitemap or create a route that outputs XML dynamically based on the current tenant’s content.
6. Monitor SEO Performance Per Tenant
The Challenge:
Without tracking tools, you won’t know how each tenant is performing in search rankings.
Best Practice:
Set up Google Search Console per subdomain or tenant path
Track keyword performance and indexing issues
Use analytics tools (e.g., Google Analytics, Plausible) to measure traffic per tenant
Laravel Tip:
Include tenant-specific tracking IDs if each tenant has separate analytics, or use filters to segment tenant data in a shared account.
Building a multi-tenant SaaS application in Laravel is just the beginning. For tenants to succeed, their web presence must be optimized with a solid SEO strategy. From URL structure to metadata and schema implementation, Laravel provides all the tools needed to help your tenants rank and convert.
With careful planning and adherence to these SEO best practices for Laravel multi-tenancy, you’ll not only improve search visibility but also provide a competitive edge for every tenant on your platform.
Conclusion
In conclusion, the exploration of multi-tenant architecture within Laravel has revealed its significance in the development of scalable Software as a Service (SaaS) applications. The ability to host multiple customers on a single application instance allows developers to maximize resource utilization while minimizing costs. By leveraging tools such as the Laravel tenancy package and integrating features tailored for multi-tenant applications in Laravel, developers can efficiently manage user data and tailor experiences to varying client needs.
By leveraging packages like stancl/tenancy, Laravel developers can streamline the setup of tenant-specific databases, routing, middleware, and authentication—all while maintaining clean, maintainable code. Whether you’re starting a new SaaS platform or converting an existing Laravel app, implementing a thoughtful multi-tenancy strategy allows you to:
Optimize resource usage
Improve performance with tenant-level isolation
Enhance security and data integrity
Scale operations efficiently across diverse user groups
We also discussed how to handle advanced challenges—such as SEO optimization, performance tuning, and secure data separation—and provided actionable best practices to guide your journey.
Recommendations for Further Learning
To dive deeper into Laravel multi-tenancy, consider exploring the following resources:
Laravel Daily — practical tutorials and real-world examples
Have questions or want to share your own experience building multi-tenant apps in Laravel? Drop a comment below—we’d love to hear from you. Your feedback helps grow the Laravel community and supports others tackling the same challenges.
Ready to Build Scalable SaaS Apps with Laravel?
Faqs
1. What is multi-tenancy in Laravel, and why is it important?
Multi-tenancy is a software architecture where a single application serves multiple customers (tenants), with each tenant’s data isolated from others. In Laravel, implementing multi-tenancy allows you to manage multiple clients using the same codebase while keeping their data and configurations separate. It’s ideal for SaaS platforms or large applications that cater to various clients without duplicating infrastructure.
2. What are the common types of multi-tenancy in Laravel?
Laravel supports several multi-tenancy strategies:
- Single Database, Shared Schema: All tenants share the same database and tables with a tenant_id column to separate data.
- Single Database, Separate Schemas: All tenants share one database but each has its own schema (less common in MySQL).
- Multiple Databases: Each tenant gets a dedicated database—most secure and scalable but resource-heavy.
3. Which Laravel packages can help implement multi-tenancy?
Some popular packages include:
- Tenancy for Laravel (tenancy/tenancy): A powerful package offering full tenant lifecycle management.
- [Hyn/multi-tenant (deprecated)]: Previously popular but now replaced by Tenancy v3.
- Laravel Breeze / Jetstream + Custom Middleware: Useful for basic tenant filtering and session handling without a full package.
4. How do I set up Tenancy for Laravel (v3)?
To use tenancy/tenancy:
- Install the package via Composer:
composer require tenancy/tenancy - Publish config and migration files:
php artisan vendor:publish --tag=tenancy - Run migrations and configure your tenant model.
- Define routes and middleware for tenant-specific logic.
- Set up hostnames and tenant identification logic based on domains or subdomains.
For full setup, follow Tenancy’s docs.
5. Can I use subdomains or custom domains for each tenant in Laravel?
Yes. Laravel and the tenancy/tenancy package support both:
- Subdomains (e.g., client1.yourapp.com) via wildcard DNS and route middleware.
- Custom domains (e.g., clientsite.com) by mapping tenant records to domains.
You can detect the tenant based on the hostname or URL segment and dynamically switch database connections accordingly.
6. Is Laravel multi-tenancy suitable for both small and large projects?
Absolutely. For small projects, using a single database with tenant_id filtering is lightweight and effective. For larger SaaS applications, a multi-database architecture provides better data isolation and performance scalability, making Laravel suitable for various business sizes.
7. What are the performance implications of Laravel multi-tenancy?
Performance varies depending on the tenancy strategy:
- Shared databases are faster to set up but may suffer from table bloat and complex queries as tenants grow.
- Separate databases isolate load and are easier to scale horizontally but require more memory and maintenance.
Using Laravel’s caching, queue, and optimized DB connections helps maintain performance across tenants.
8. How do I handle authentication in a multi-tenant Laravel app?
Authentication can be tenant-specific. Some common practices:
- Load users based on tenant context before login.
- Use Laravel guards and middleware to ensure tenant-based access control.
- Store tenant identifiers in sessions or subdomain routes to auto-load tenant configurations during user login.
9. What are the best practices for database migrations in multi-tenant apps?
Create universal migrations for system-wide tables.
- Use tenant-aware migrations to manage tenant-specific tables.
- Automate migrations when new tenants are created using events or CLI commands like:
php artisan tenants:migrate
10. Can I migrate an existing Laravel app to support multi-tenancy?
Yes, but it involves careful planning:
- Refactor database schema to include tenant identifiers or move to multiple DBs.
- Separate global and tenant-specific logic.
- Implement tenant detection and dynamic database switching.
- Use packages like
tenancy/tenancyfor smoother migration support.
The process can be complex, but many Laravel teams have successfully done it with proper architectural planning.